Fabric Networking: Trusted Workspace Access for OneLake Shortcuts
Overview
Along with Managed Private Endpoints, another security feature was released at the same time called Trusted Workspace Access for OneLake Shortcuts. Now, I had actually conflated these 2 features during my testing so I have now separated this into 2 blogs. This blog specifically covers the Trusted Workspace Access, please refer to this blog which discusses the Managed Private Endpoint feature which is how to allow Spark access to secured data services.
To be honest I’m surprised we have multiple methods to allow Fabric to connect to secured services. I have a blog coming in the next couple of weeks about the overall networking aspect of Fabric including VNet Data Gateways and trying to get to the root of all this. I hope Fabric Networking doesn’t become too fragmented.
The upshot of this new feature is that we can enable connectivity from a Lakehouse Shortcut to an Azure Data Lake Gen2 storage account that is disabled from public access. Here is the official documentation.

This is standalone functionality so you do not need to setup other networking features such as VNet Data Gateways or Managed Private Endpoints, they are separate features.
Considerations
Here’s the biggest catch, only F64 and above, plus Fabric trial capacities are supported. So no luck for anyone trying to implement this under F64 and P SKUs. I very much hope this changes and I have fed back to Microsoft this concern.
Read the list of considerations here (always read new features limitations and considerations).
Configuring the Workspace Identity
First thing we need to do is switch on the Workspace Identity in a workspace you wish to create the Lakehouse Shortcut from.
- Go to the Fabric F64+ SKU workspace and select Workspace Settings
- Click on Workspace Identity tab
- Click + Workspace Identity

After a few minutes you should see the Workspace Identity has been created and a list of authorised users, which is inherited from the Workspace permissions itself.

Secure Workspace Access to Storage Account
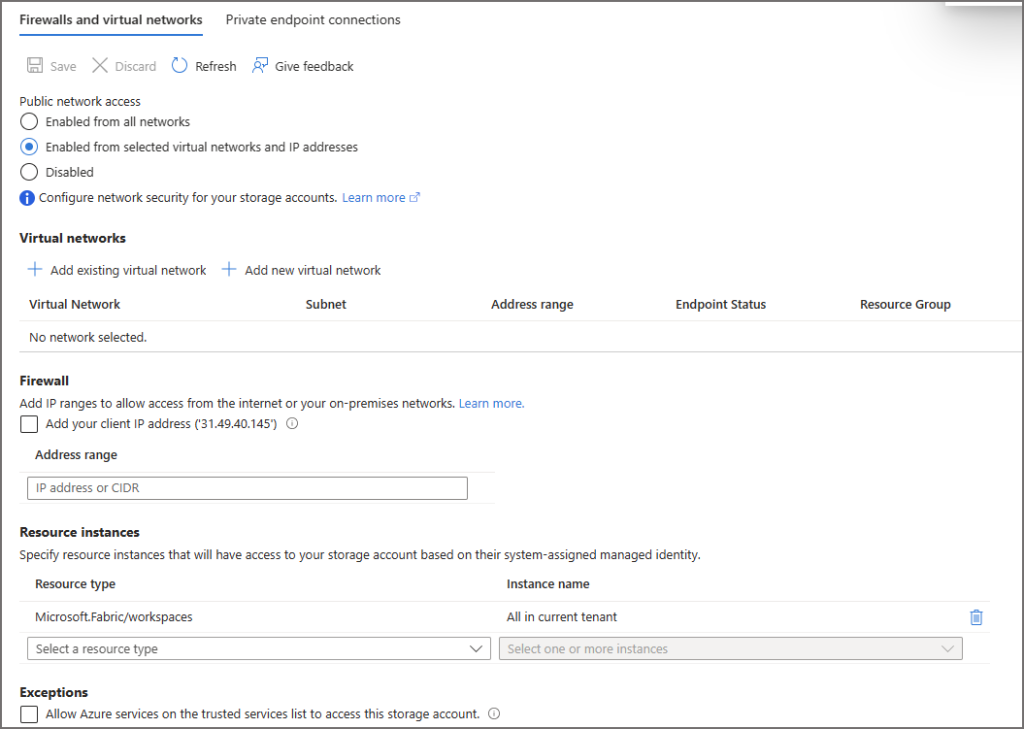
In terms of how Workspaces access the storage account, you have the option of allowing all your workspaces to access the storage account or limit to specific Workspaces by using Resource Instances in the storage account. If the storage account is disabled from public access and is not enabled for “Allow Azure Services on the trusted services list” then you’ll need to add Resource Instances. To check this (and if you have access to the storage account) do the following:
- Go to the storage account in Azure portal
- Click on Networking under Security + Networking
- Under Public Network Access select Enabled from selected virtual networks and IP addresses
- Under Settings, check if the Allow Azure services on the trusted services list to access this storage account option is enabled. If it’s enabled, Fabric can access the storage account regardless if it’s disabled from public access as this setting overrides the public access disabling.
MS recommends disabling the Allow Azure services on the trusted services list to access this storage account option. If this is disabled, then you need to configure the Resource Instances option, let’s do that now.
Allowing All Workspaces
To allow all Workspaces to access the storage account:
- In the Networking area of the storage account ensure that Enabled from selected virtual networks and IP addresses is enabled
- Then in the Resource Instances option:
- Select Resource Type Microsoft.Fabric/workspaces
- Set Instance Name to All in current tenant.

Now you can configure Shortcuts from any Workspace that has the Workspace Identity enabled.
Restricting Access to Specific Workspaces
If you don’t want all Workspaces to have access, then we can actually limit the access to specific workspaces by adding Workspace GUIDs to the Resource Instance option. There’s no way of doing this in the portal GUI so here’s a PowerShell script that you can run to add a Workspace GUID as a Resource Instance.
- You can obtain the Workspace GUID either using the REST APIs or in the browser URL, E.G. https://app.powerbi.com/groups/d5723636-d844-4bf7-bfc2-8ad519fdef14/list?experience=power-bi
- Tenant ID can be obtained from the Microsoft Entra ID section in Azure, or from the Help > About Power BI area in the Power BI/Fabric portal
- Resource Group Name is the Azure resource group the storage account is located
- Account Name is the storage account name
You may need your local friendly Azure administrator to help with this if you don’t have access.
$resourceId = "/subscriptions/00000000-0000-0000-0000-000000000000/resourcegroups/Fabric/providers/Microsoft.Fabric/workspaces/<YOUR_WORKSPACE_GUID>"
$tenantId = "<YOUR_TENANT_ID>"
$resourceGroupName = "<RESOURCE_GROUP_OF_STORAGE_ACCOUNT>"
$accountName = "<STORAGE_ACCOUNT_NAME>"
Add-AzStorageAccountNetworkRule -ResourceGroupName $resourceGroupName -Name $accountName -TenantId $tenantId -ResourceId $resourceId
Once this has been done, you should see the Workspace GUID in the Resource Instance list.

Create Lakehouse Shortcuts
I use Shortcuts a lot (I’m glad the Shortcuts API is now available) and I failed the first time as I tried to shortcut to a storage account that existed in a different region to my Fabric capacity.
Before creating the Shortcut, you need to make sure the Entra (User) account (or Service Principal) being used to create the Shortcut has been added to the storage account as per the documentation.
“The principal must have a Storage Blob Data Contributor, Storage Blob Data owner, or Storage Blob Data Reader role at the storage account scope, or a Storage Blob Delegator role at the storage account scope in addition to a Storage Blob Data Reader role at the container scope“
- Open a Fabric Lakehouse and navigate to the Files area (for my test this was Files) Select or Create a new folder under Files and then click the elipsis Select New Shortcut and select Azure Data Lake Gen2 Enter the storage account DFS endpoint URL as normal and select relevant authentication Enter the relevant container and folder
I could now work with the Files in the secured ADLS Gen2 storage account. In my testing I could read and write to the Files section using the Shortcut.
Pipelines Using Shortcuts
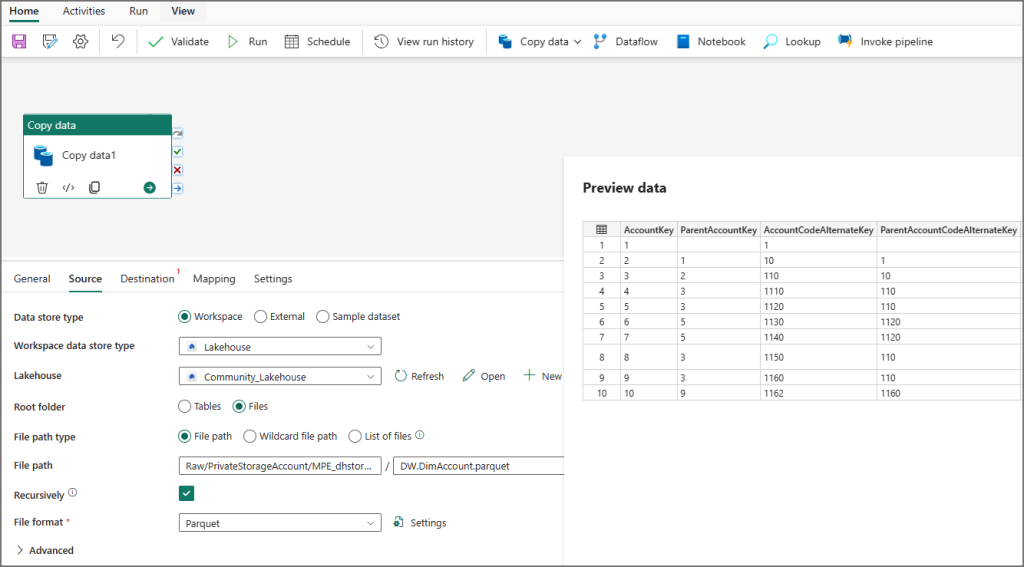
I have tried using Pipelines directly on the secured ADLS Gen2 storage account by using the External option in the Copy Data task but unfortunately I received an error message about network security…which is to be expected. However, I was able to create a Pipeline and use a Lakehouse Shortcut to access the files (you can’t write to the files yet). Not ideal but an acceptable workaround IMHO.

This is a snippet of the error message received when I try and access the secured storage account using the External option and specifying the DFS endpoint URL:
ADLS Gen2 failed for forbidden: Storage operation ” get failed with ‘Operation returned an invalid status code ‘Forbidden”. Possible root causes: (1). It’s possible because the service principal or managed identity don’t have enough permission to access the data. (2). Please check storage network setting whether public network access is disabled.
Conclusion
A very useful feature to allow Lakehouse Shortcuts to access ADLS Gen2, however my concern is that network connectivity functionality appears to be split over multiple methods which may cause some confusion (in my initial testing at least).


I’m still interested to see that article clarifying the differences and overlaps between VNet data gateways, MPE and related options for outbound access to resources, whether on prem or in Azure, etc. It seems they lost some functionality that was available in Synapse previously, but all the terms are confusing and tend to leave you wondering how badly you want the feature and whether its worth the cost. In Databricks, for example, even small workspaces can access private resources with a VPC setup. It’s crazy how they are restricting features like that where we need time to nurture the use cases within an organization so that it can grow over time.