Part of the upcoming Azure Enterprise Data Analyst Associate exam, the DP-500, is to understand how to identify data sources in Azure using Microsoft Purview. In this blog post we’ll cover how to use the Data Map to manage collections, view data sources in Azure, and also how to register a data source.
This blog forms part of the Mastering DP-500 exam series. A list of available blogs is here and is in association with Data Mozart.
Please note that Microsoft has renamed Azure Purview to Microsoft Purview, although the exam material currently references Azure Purview, I will reference the service as Microsoft Purview.
Learning Focus
The learning focus for this blog concentrates on the following area in the Skills Measured document published by Microsoft.
Implement and manage a data analytics environment (25-30%)
Govern and administer a data analytics environment
– Identify data sources in Azure by using Azure Purview
Please note that as this blog is focused on certification, the content is based on official Microsoft documentation. The References section contains all links used in this blog.
Purview Setup
Please refer to the following blog which has a section on creating a new Microsoft Purview service.
Purview Studio
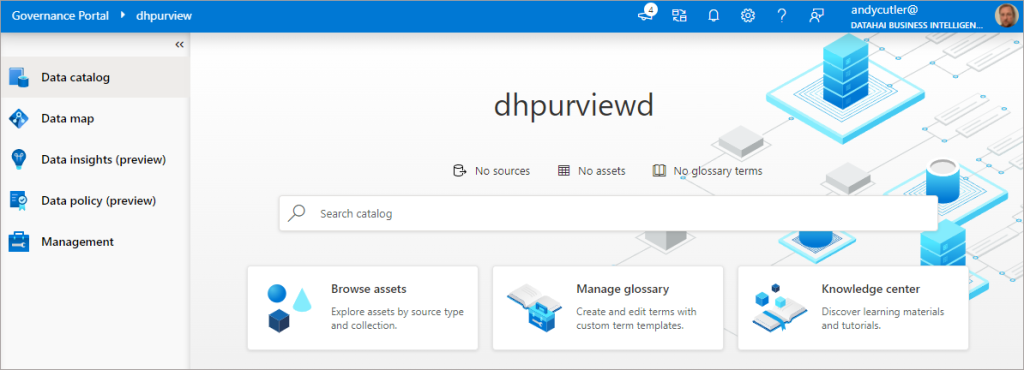
When logging into Microsoft Purview Studio, the following main page is visible:
Managing and Viewing Collections
Within the Data Map is the Collections area. This allows for registering and grouping data sources within a collection to allow a logical grouping of data sources and assets to meet an organization’s topology. Clicking on Data Map and Collections allows administration of collections including creating and deleting collections and assigning permissions.
Please note there is a single root collection named after the Purview account, all collections created under the root collection are called subcollections.
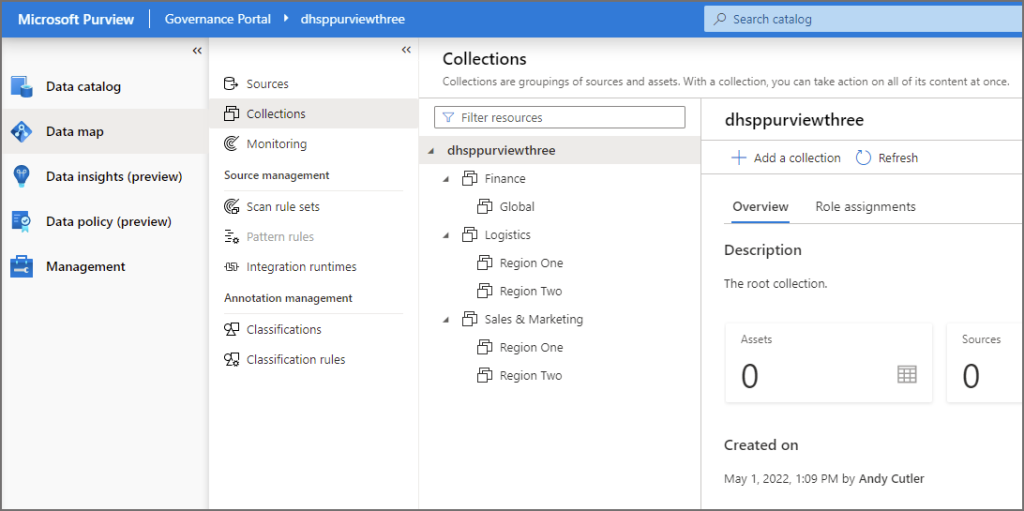
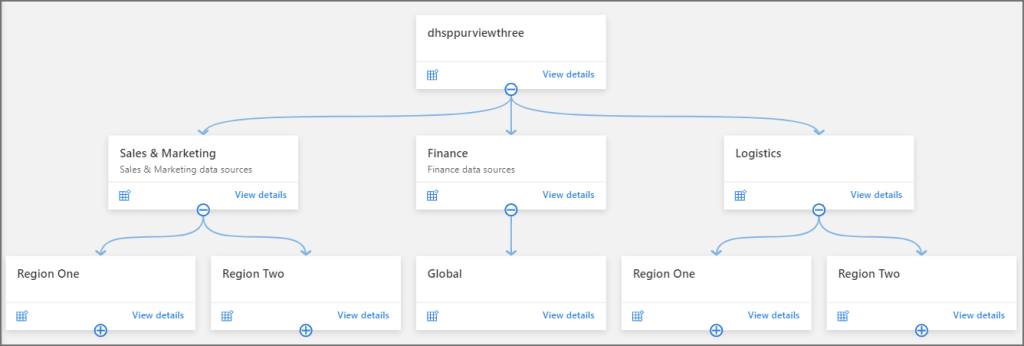
For example, organisation may wish to group data sources by business division or geographical location. In the following example, a collection topology has been created in which business division is the top-most tier in the collection hierarchy, followed by region. A collection topology can be created to match any organisation layout.
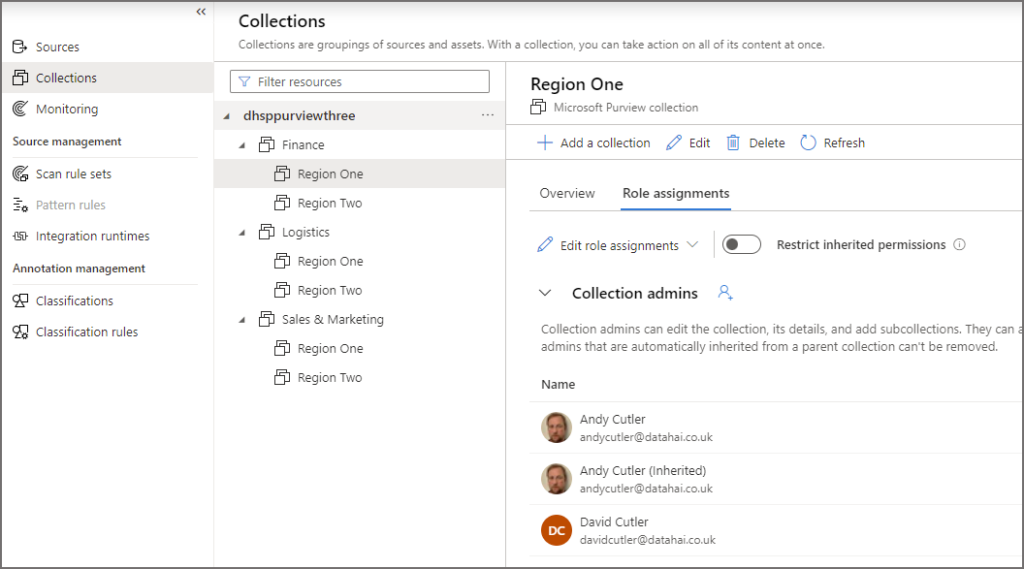
A Collection topology also enables permissions to be set on a per collection basis, groups of users can be permitted to view only certain data sources. E.G. a user can be added as a Collection Admin to one of the subcollections, in the following example David has been added to the Sales & Marketing > Region One subcollection as a Collection Admin.
Viewing Data Sources in Collections
Further to the example Collection topology earlier, lets show data sources linked to each collection. In the following image, you can see that there are 2 Azure SQL Servers registered to Region One and Region Two of the Sales & Marketing subcollection. Whilst there are 2 Data Lake Gen2 accounts registered to Region One and Region Two of the Logistics subcollection.
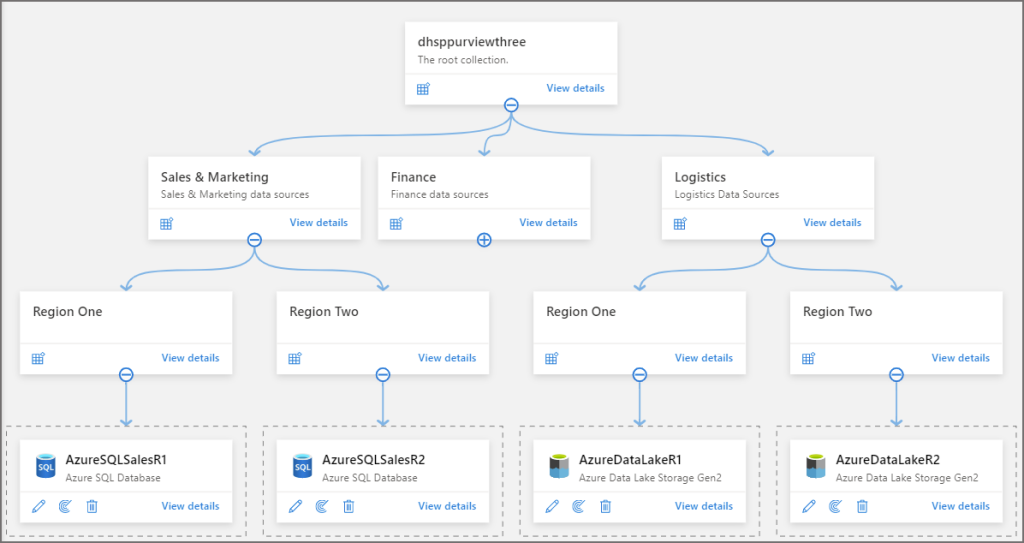
Viewing Data Sources within Collections
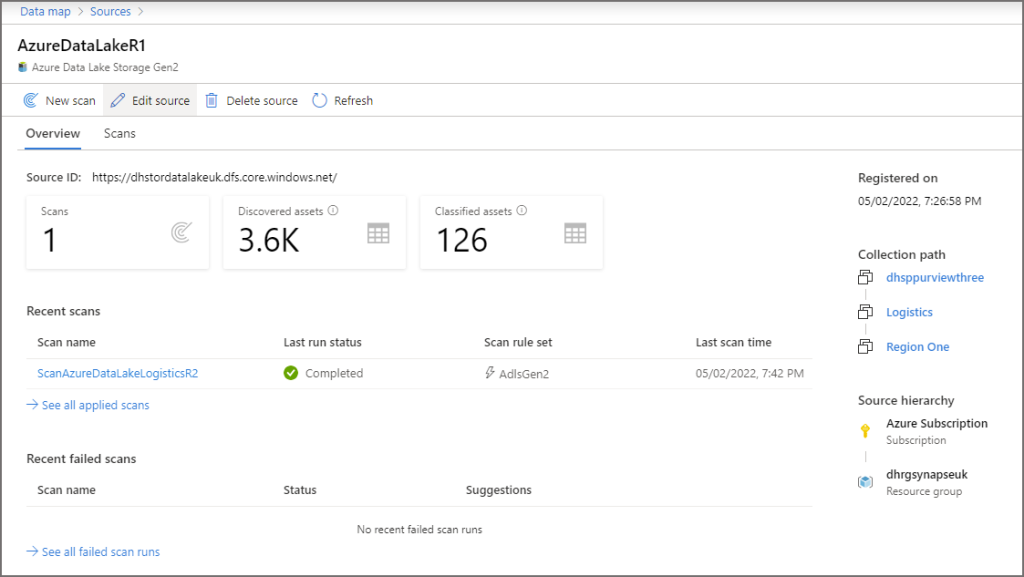
By clicking View details on a data source, we can see details including the Scan name and status of any scans, the URL/Path of the data source, the number of assets discovered, and the number of assets classified. Classification is based on pattern matching data within an asset (such as a column) matching a definition such as email address, postcode etc.
We cannot view any assets discovered or classified within the Sources area. We will search and browse assets in the Data Catalog area in a later step.
Registering a Data Source
In order to discover and classify assets, we must add a data source to Purview. In this scenario we’ll add an Azure Synapse Analytics data source to the Finance > Global subcollection and then initiate a scan on a Dedicated SQL Pool. Please note that scanning Serverless SQL Pools databases are also supported.
Register Azure Synapse Analytics
- Ensure you are logged in as a user that has been assigned to the Data source admins and Data readers role
- Click Data Map on the left menu, click Sources, then click Register

- Search for Azure Synapse Analytics (Multiple)
- Click Continue and enter the relevant information:
- Name: Give the Data Source a relevant name E.G. AzureSynapseAnalyticsFinance
- Azure Subscription: Select the subscription the Synapse workspace is in
- Workspace Name: Select the Synaose workspace to register
- Select a collection: Select the appropriate collection/subcollection to register the data source to. E.G. Finance > Global
- Click Register

Once the Azure Synapse Analytics workspace has been registered as a data source in the subcollection, we can initiate scans to discover assets.
Setup Permissions for Purview Scan
We must setup permissions in Synapse Analytics to allow Purview to list the available Synapse resources. Then we must setup permissions in the Dedicated SQL Pool to allow Purview to scan.
- Browse to the Synapse Analytics resource in the Azure portal (not the workspace Studio itself)
- Click Access Control (IAM) and then click Add > Add Role Assignment
- Search for the Reader role then click Members in the top tab menu
- Select Managed Identity for the Assign access to option
- Click Select members and search for the Managed Identity of the Purview account
- Click Select then Review + Assign

Now we must add permissions to any Dedicated SQL Pool we want Purview to scan. In this scenario there is a single Dedicated SQL Pool in the Synapse Analytics workspace.
- Using Synapse Studio, SSMS, Azure Data Studio, or any SQL client that can run SQL queries on Synapse
- Login to the Dedicated SQL Pool database with a user with permissions to add users
- Run the following SQL, ensuring to add in the relevant Purview account name
--Create user
CREATE USER [purviewaccountname] FROM EXTERNAL PROVIDER
GO

--add purview account user to db_datareader role
EXEC sp_addrolemember 'db_datareader', [purviewaccountname]
GO
Once these permissions are in place, we can now setup and initiate a scan from Purview.
Scan Azure Synapse Analytics
- Click Data Map on the left-hand menu then click the Sources tab
- If in Map view, click the scan icon on the AzureSynapseAnalyticsFinance source
- If in Table view, either hover over the Synapse Analytics source name and click the scan icon, or click the New Scan link.

- Enter an appropriate name for the scan E.G. Scan-SynapseAnalyticsFinance
- Ensure Type is SQL Database and that Credential is Microsoft Purview MSI
- From the SQL Databases drop-down, select the relevant Dedicated SQL Pool
- Check the Select a collection is the same as the registered data source
- Click Test Connection and review the report if there are any errors
- If all OK, then click Continue

- Accept the default scan rule set SYSTEM DEFAULT and click continue
- Click Once on Set a scan trigger and click Continue
- Review the scan and if all OK, click Save and run
Review Scan Results
We can view the status of the scan by clicking on View details on the Synapse Analytics data source in the Finance > Global subcollection if in Map View, or if in Table View we can click the name of the Synapse Analytics data source. In the image below we can see that the scan has completed successfully and has discovered 41 assets and classified 35 of these assets. The following types of assets have been discovered:
- Tables
- Views (including Materialized)
- Schemas

Now that the scan has been completed and assets discovered, in the next section we’ll browse and search for assets using the Data Catalog.
Browsing and Searching the Data Catalog
Once data sources have been registered and scans have been successful, we can browse and search for assets.
Browsing Assets
- Click on Data Catalog on the left menu
- Click Browse Assets on the main page
- From here we can either browse By Collection or By Source Type. E.G. we could browse all assets registered under the Sales & Marketing > Region One subcollection (By Collection) or we could browse all assets registered from Azure SQL Servers (By Source Type).
- Click the By Collection tab and expand Finance and click on Global
- All the assets registered under the Global subcollection are now visible.

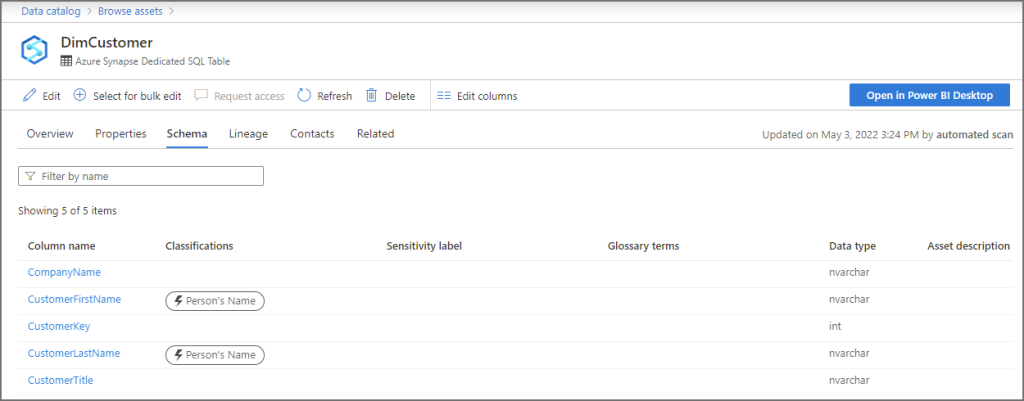
By clicking on an asset we can see details relating to that asset. If we click on DimCustomer then click on the Schema tab we can see the columns within the table, including their data types and the automatic classification that Purview assigned to certain columns during scanning. We can click Edit to add/amend the details associated to this asset including adding glossary terms.
Searching Assets
We can also enter search terms to search for assets:
- Click on Data Catalog on the left menu
- Enter a search term
- From the results, select either:
- Search Suggestion: Takes you to a list of assets that match the filter
- Asset Suggestion : Takes you direct to the actual asset page

By clicking on Customer under Search Suggestions, all assets relating to the term Customer from all collections/subcollections are displayed.

Supported Data Sources
Please refer to the Microsoft documentation to view all supported data sources in Purview here.
References
- Connect to and manage multiple Azure sources – Microsoft Purview | Microsoft Docs
- Metadata and lineage from Azure Synapse Analytics – Microsoft Purview | Microsoft Docs
- Microsoft Purview supported data sources and file types – Microsoft Purview | Microsoft Docs
- How to manage multi-cloud data sources – Microsoft Purview | Microsoft Docs
- How to: browse the Data Catalog – Microsoft Purview | Microsoft Docs
- How to: search the Data Catalog – Microsoft Purview | Microsoft Docs
- Create and manage credentials for scans – Microsoft Purview | Microsoft Docs

[…] Using the Data Map in Microsoft Purview […]